
'%3e%3cpath%20fill-rule='evenodd'%20clip-rule='evenodd'%20d='M6.99935%2012.8327C10.221%2012.8327%2012.8327%2010.221%2012.8327%206.99935C12.8327%203.77769%2010.221%201.16602%206.99935%201.16602C3.77769%201.16602%201.16602%203.77769%201.16602%206.99935C1.16602%2010.221%203.77769%2012.8327%206.99935%2012.8327Z'%20stroke='%23666666'%20stroke-linecap='round'%20stroke-linejoin='round'/%3e%3cpath%20d='M1.16602%207H12.8327'%20stroke='%23666666'%20stroke-linecap='round'%20stroke-linejoin='round'/%3e%3cpath%20fill-rule='evenodd'%20clip-rule='evenodd'%20d='M6.99935%2012.8327C8.28802%2012.8327%209.33268%2010.221%209.33268%206.99935C9.33268%203.77769%208.28802%201.16602%206.99935%201.16602C5.71068%201.16602%204.66602%203.77769%204.66602%206.99935C4.66602%2010.221%205.71068%2012.8327%206.99935%2012.8327Z'%20stroke='%23666666'%20stroke-linecap='round'%20stroke-linejoin='round'/%3e%3cpath%20d='M2.875%202.95898C3.93063%204.01461%205.38896%204.66754%206.99978%204.66754C8.61062%204.66754%2010.069%204.01461%2011.1246%202.95898'%20stroke='%23666666'%20stroke-linecap='round'%20stroke-linejoin='round'/%3e%3cpath%20d='M11.1246%2011.0425C10.069%209.98691%208.61062%209.33398%206.99978%209.33398C5.38896%209.33398%203.93063%209.98691%202.875%2011.0425'%20stroke='%23666666'%20stroke-linecap='round'%20stroke-linejoin='round'/%3e%3c/g%3e%3cdefs%3e%3cclipPath%20id='clip0_1267_9109'%3e%3crect%20width='14'%20height='14'%20fill='white'/%3e%3c/clipPath%3e%3c/defs%3e%3c/svg%3e)


 Service Center
Batch Sign
Before using the features in this user manual, you need to understand the applicable scope of the batch signing feature:
- Batch signing is suitable for scenarios where multiple pending signature envelopes need to be processed at once, such as bulk onboarding documents, bulk procurement agreements, daily routine contracts, etc.
- This feature is available on the Web client.
- The batch signing entry point can be used in [Pending Signatures] and [Inbox].
- You must select at least 2 envelopes each time to enter the batch signing process; if only 1 envelope is selected, the system will proceed with the standard single-envelope signing process.
- Batch signing will uniformly select a signature or seal and apply it to all envelopes eligible for batch signing in this session.
With eSign.AI batch signing, you can select multiple envelopes at once from the pending signatures list or inbox. The system will first distinguish which envelopes can be batch signed and which require individual processing. For envelopes eligible for batch signing, you can uniformly specify signing positions, choose a signature or seal, and view the batch signing results in the task center.
Initiate Batch Signing
-
Navigate to [Pending Signatures] or [Inbox].
-
Check the envelopes that need to be batch signed.
Note:
- At least 2 envelopes must be selected to enter the batch signing process.
- If only 1 envelope is selected, clicking [Batch Signing] will take you to the standard signing process for that envelope.
-
Click [Batch Signing].
The system will open the batch signing confirmation page and display the processing results for the selected envelopes.
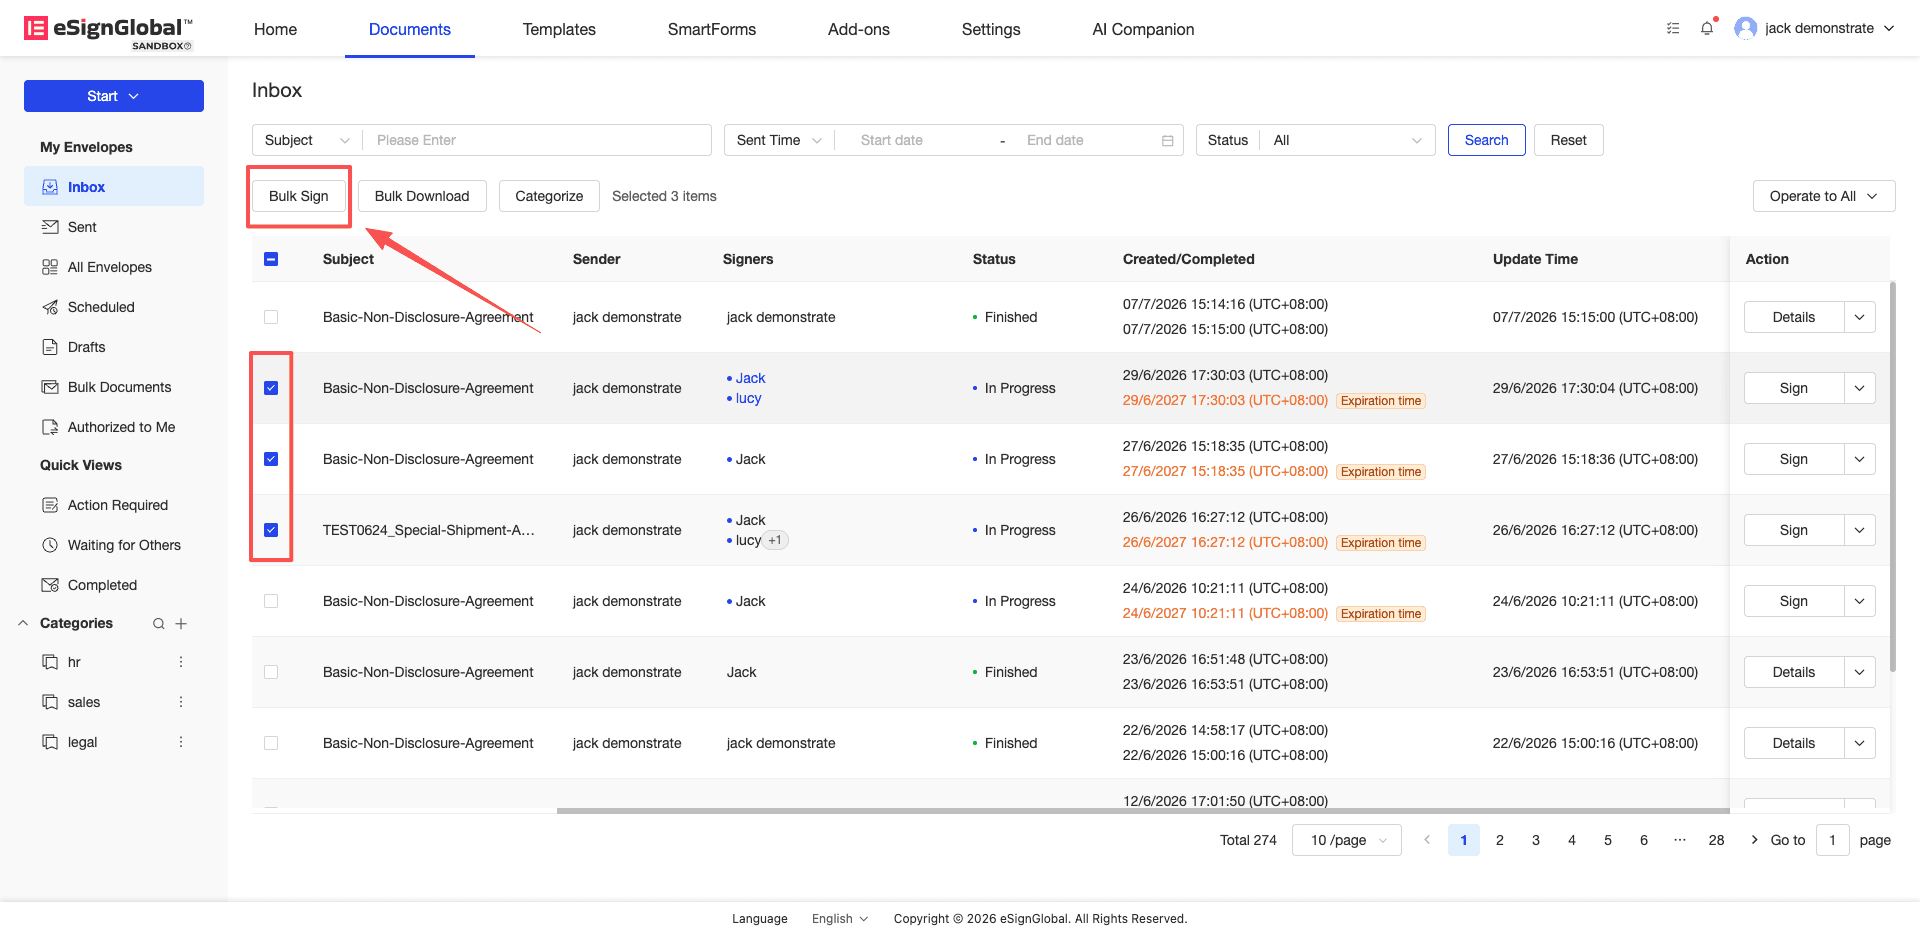
Confirm Envelopes Eligible for Batch Signing
-
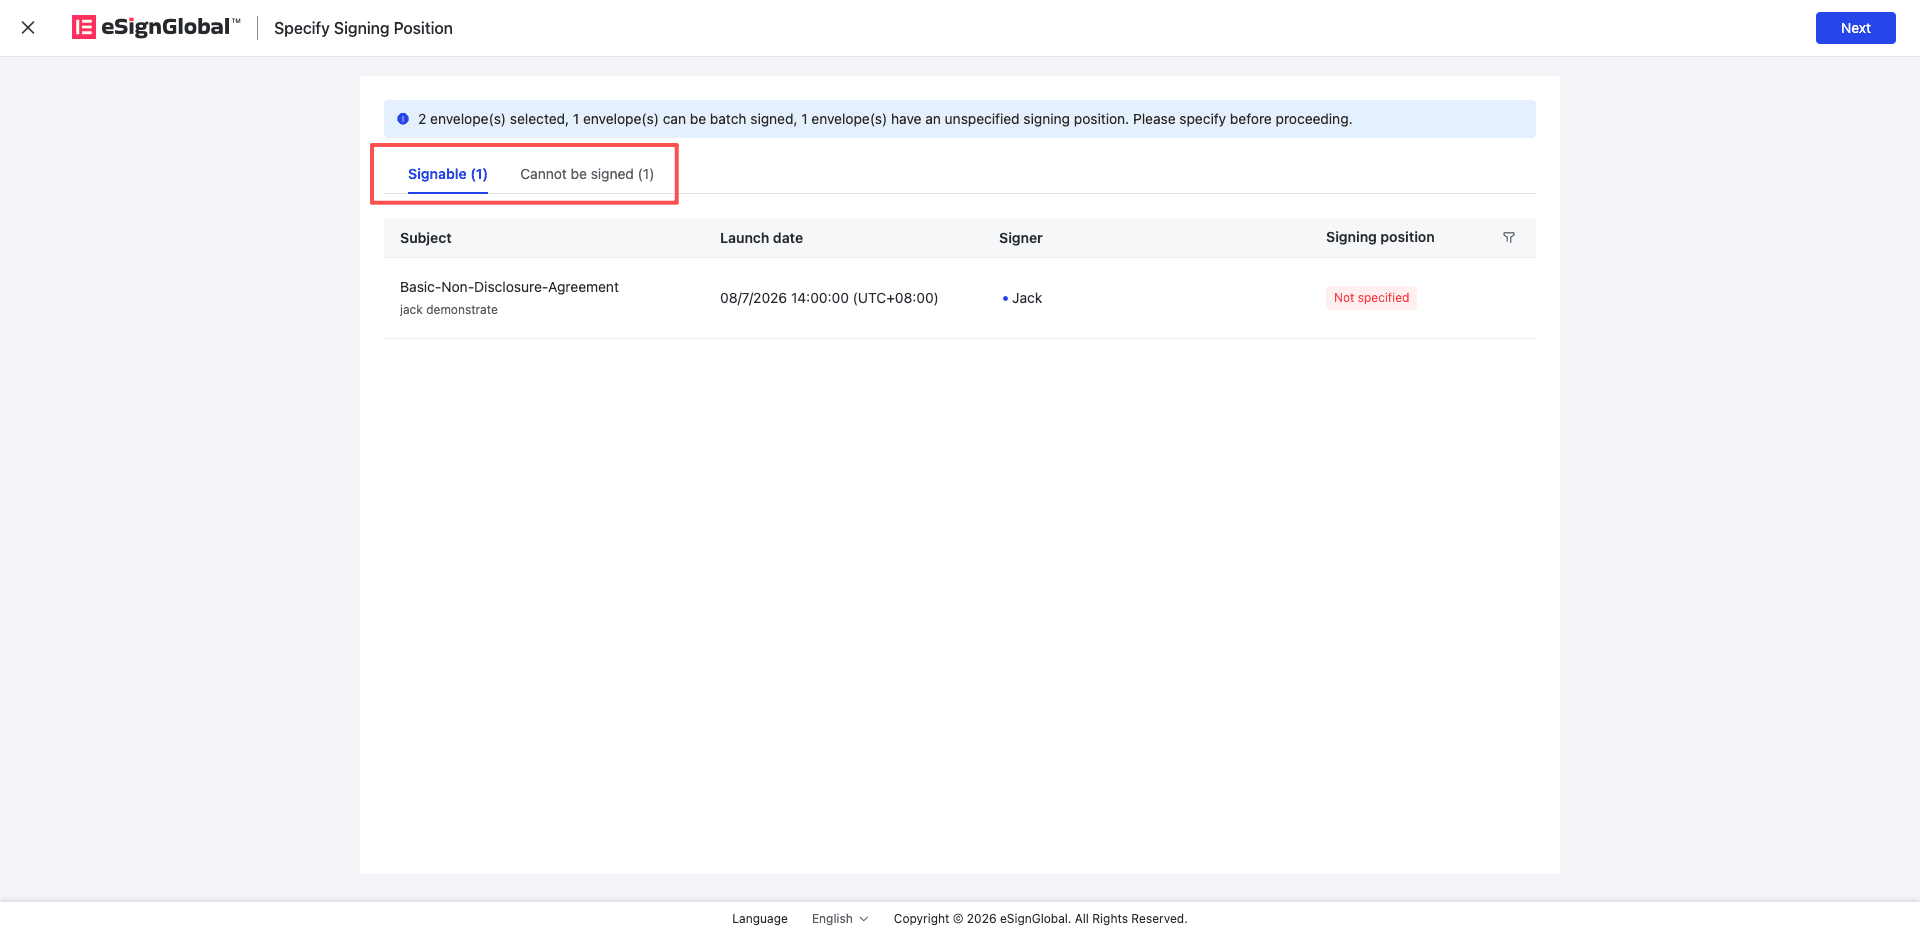
View envelope categories on the [Batch Signing] confirmation page.
The page typically displays the following tabs:
- Eligible for Batch Signing: Envelopes that can continue with batch signing.
- Not Eligible for Batch Signing: Envelopes that cannot be processed via batch signing.
-
View signable envelopes under the [Eligible for Batch Signing] tab.
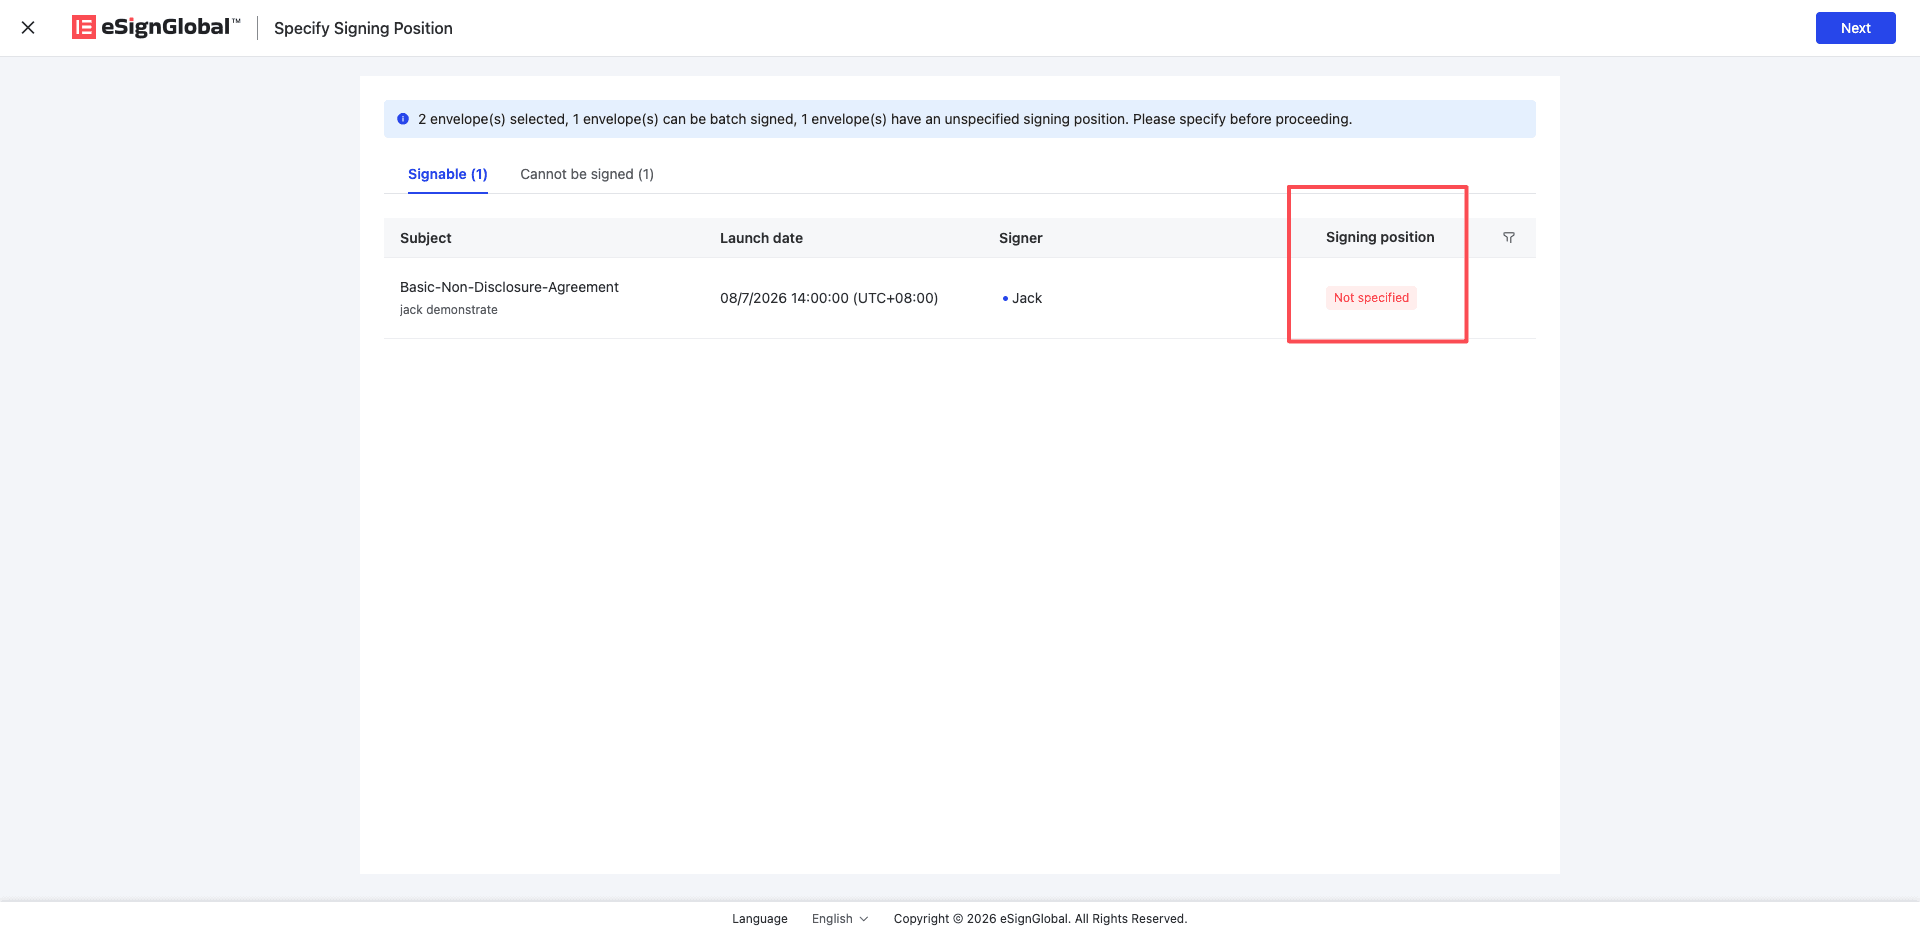
You can view the envelope subject, initiator, signers, and signing position status.
-
View non-signable envelopes and their reasons under the [Not Eligible for Batch Signing] tab.
Tip:
- Non-batch-signable envelopes will not affect the continued processing of signable envelopes.
- For envelopes that cannot be batch signed, you can return to the list and handle them one by one using the standard single-envelope signing method.
-
If none of the envelopes can be batch signed, the page will only display the list of non-signable envelopes, and the [Next] button will be disabled.
Specify Signing Positions
-
If there are signable envelopes without specified signing positions, the page will prompt you to specify them first.
-
Click [Next].
-
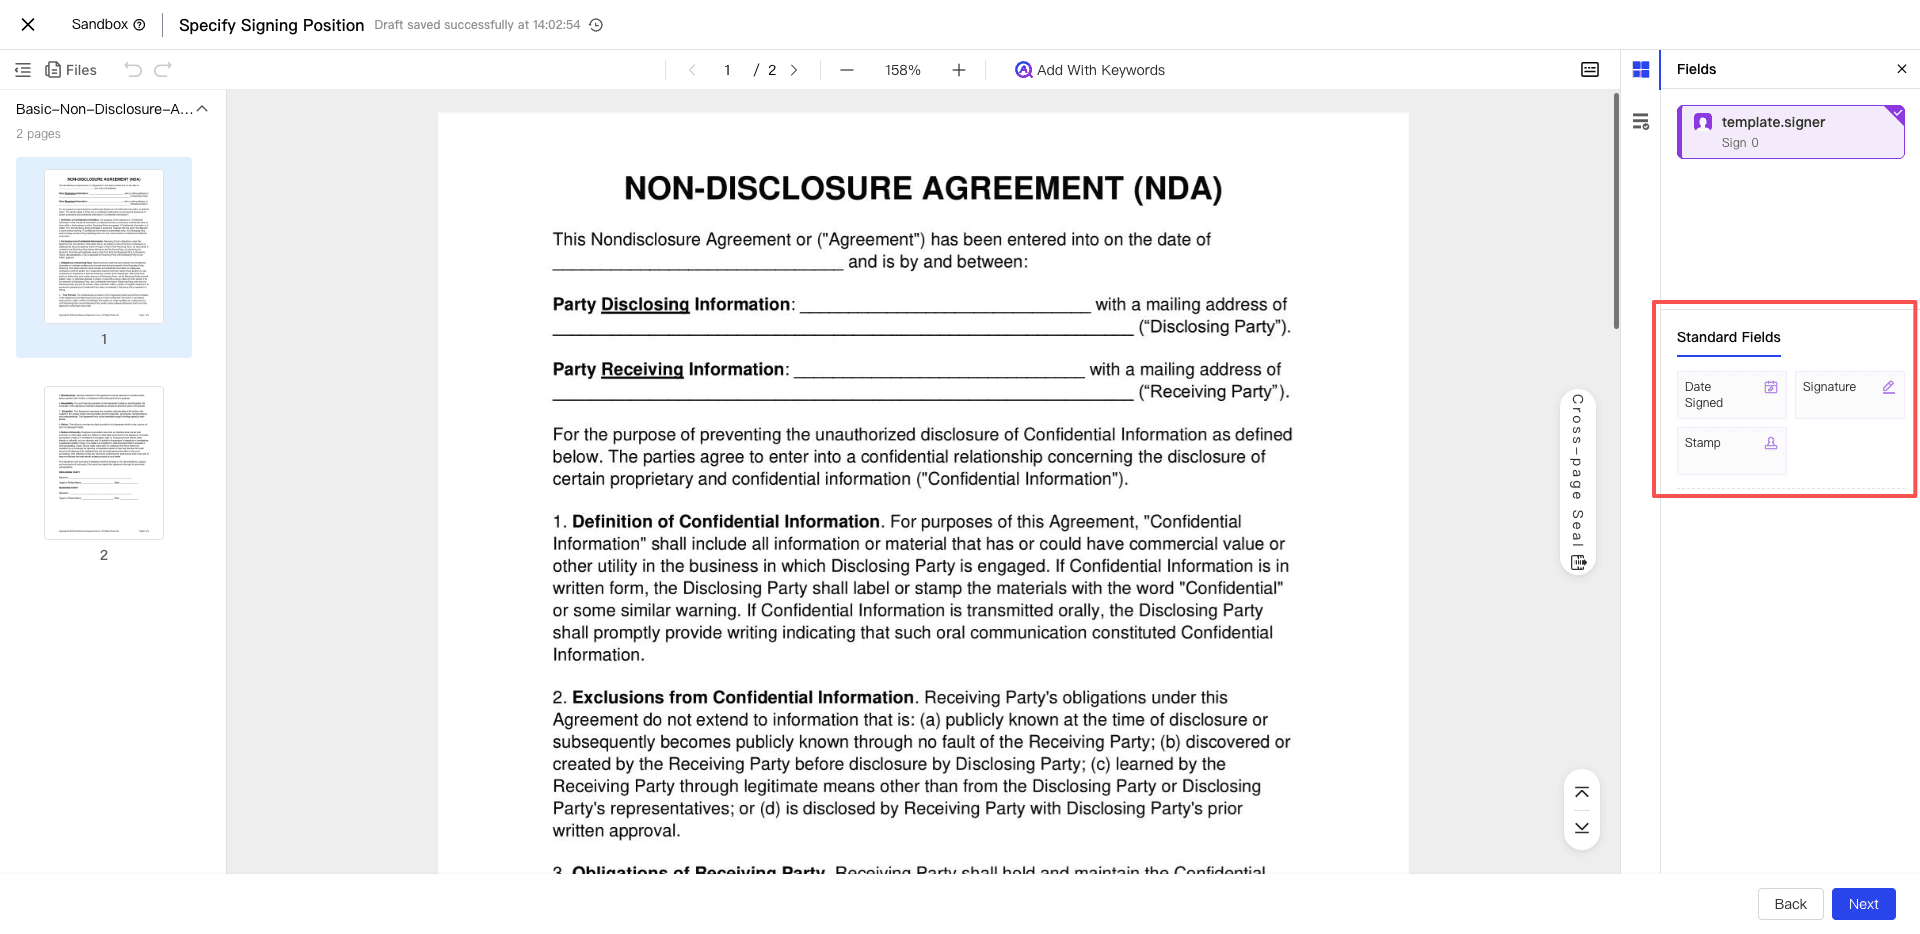
On the Specify Signing Positions page, drag the controls from the right panel to the target locations in the document.
Available controls include:
- Signature Area
- Seal Area
- Cross-page Seal Area
-
After confirming the positions are correct, click [Confirm].
The system will proceed to the Select Signature or Seal page.
Note:
- When specifying signing positions, the system will use the document with the fewest pages among the envelopes requiring position specification as the reference file.
- The positions you specify will be applied to all envelopes in this session that require position specification.
- If the layout or page size differs across envelopes, the final positions may have slight offsets. Please verify that the positions meet your expectations before submitting.
-
To return to the confirmation page, click [Previous].
If you navigate back before clicking [Confirm], any dragged positions will not be saved.
Select Signature or Seal
-
Navigate to the [Select Signature/Seal] page.
-
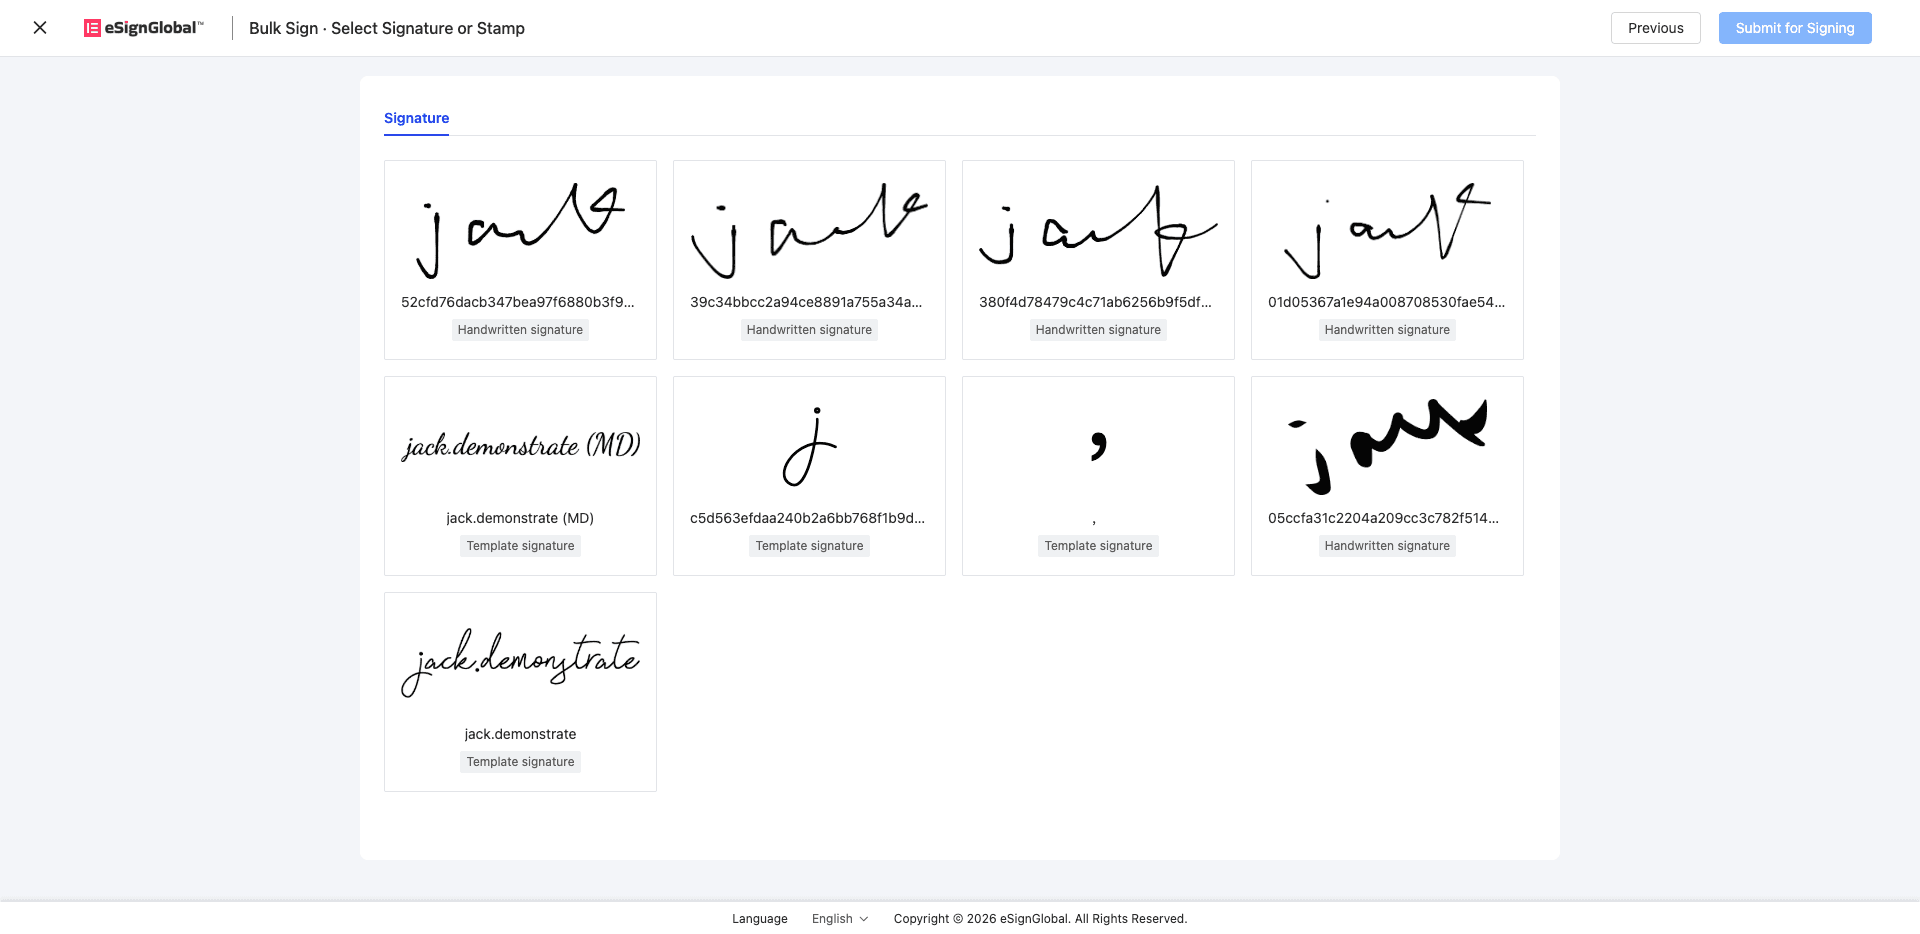
Based on the tabs displayed on the page, select the signature or seal to use for this batch signing.
The page may show:
- Signature: Select a signature.
- Seal: Select a seal.
Tip:
- The page will display the corresponding tab based on the requirements of this signing session.
- If only a signature is needed for this session, complete the signature selection only.
- If both a signature and a seal are required, you must complete both selections before submitting.
-
If no available signature is found, create one following the on-page instructions. After creation, return to the original page and refresh to retrieve the newly created signature.
-
If no available seal is found, contact your administrator to configure a seal; administrators can handle this via the Seal Management page. After creation, return to the original page and refresh to retrieve the newly created seal.
-
Once you have confirmed your selection, click [Submit Signing].
Upon submission, the system will create a batch signing task and redirect you to the Task Center.
View Batch Signing Results
-
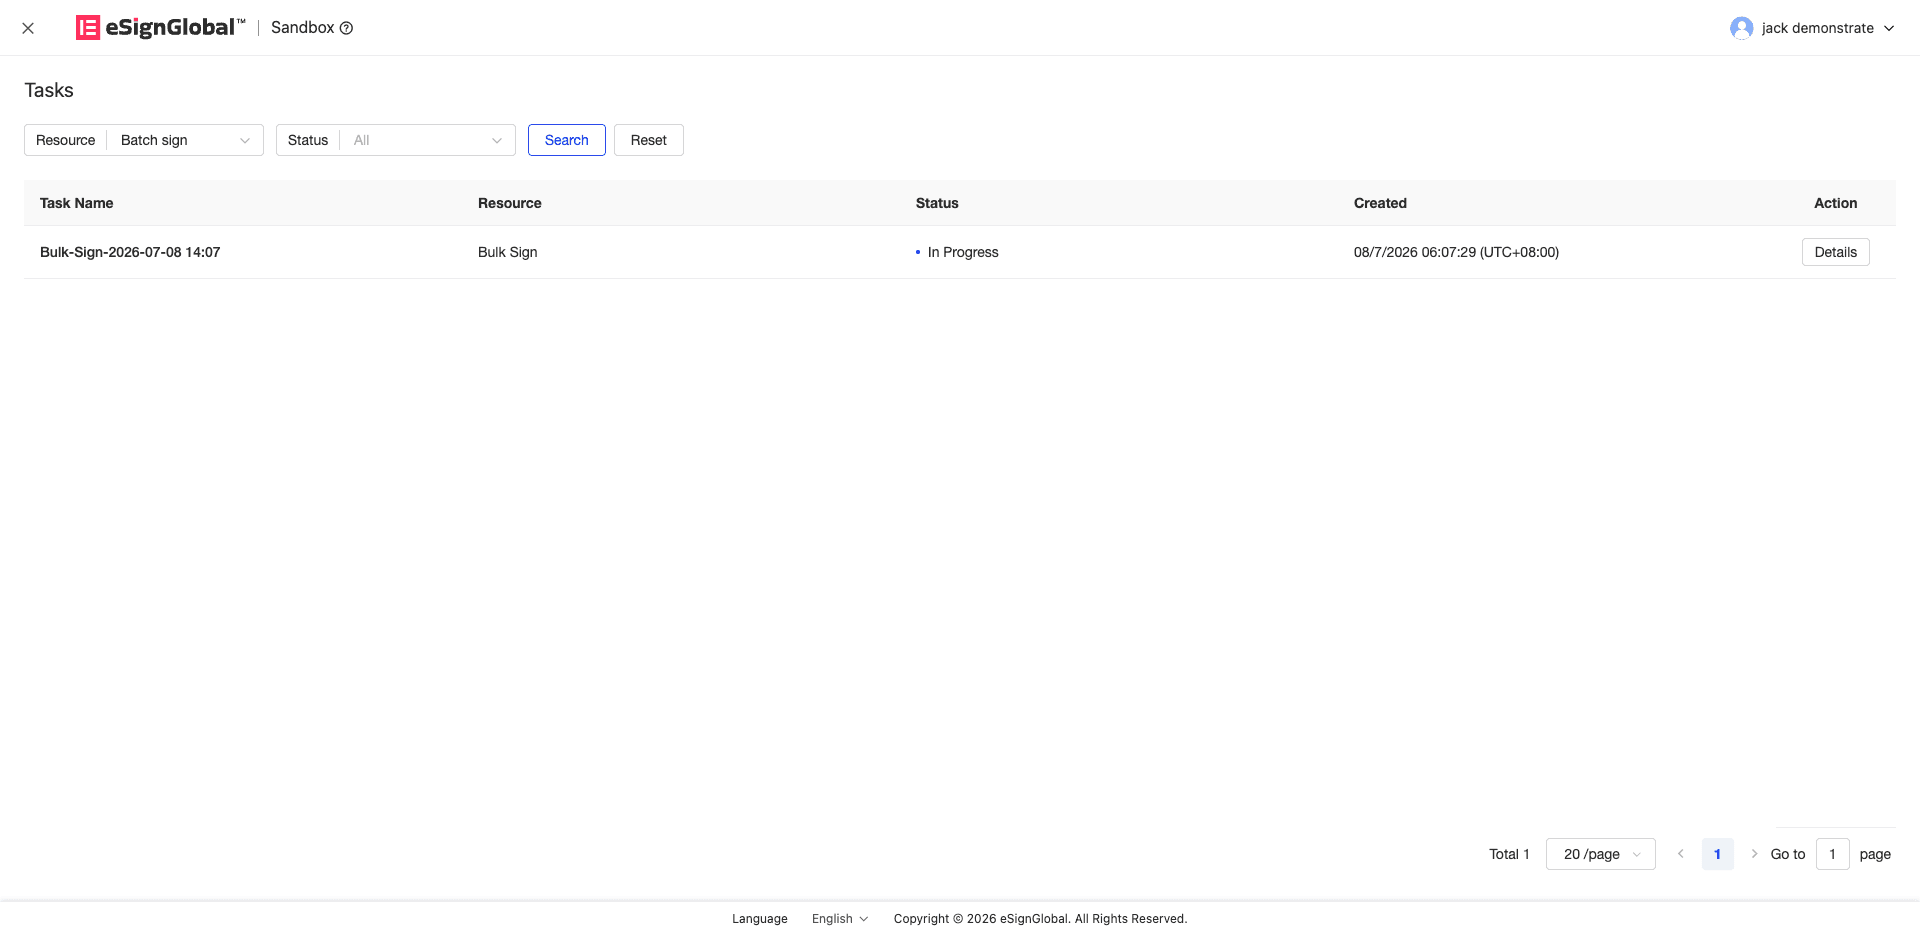
After submitting the batch signing, go to the Task Center to view the task.
-
Locate the [Batch Signing] task in the task list.
The task name is typically generated based on the submission time, e.g.,
Batch Signing – YYYY/MM/DD HH:mm. -
Check the task status.
Task statuses include:
- Processing: The task is currently being processed.
- Success: The task has been completed successfully.
- Failed: The task processing failed.
Note:
- The status shown here refers to the overall batch signing task itself and does not guarantee that every envelope was signed successfully or failed.
- For the specific processing result of each envelope, please check the task details.
-
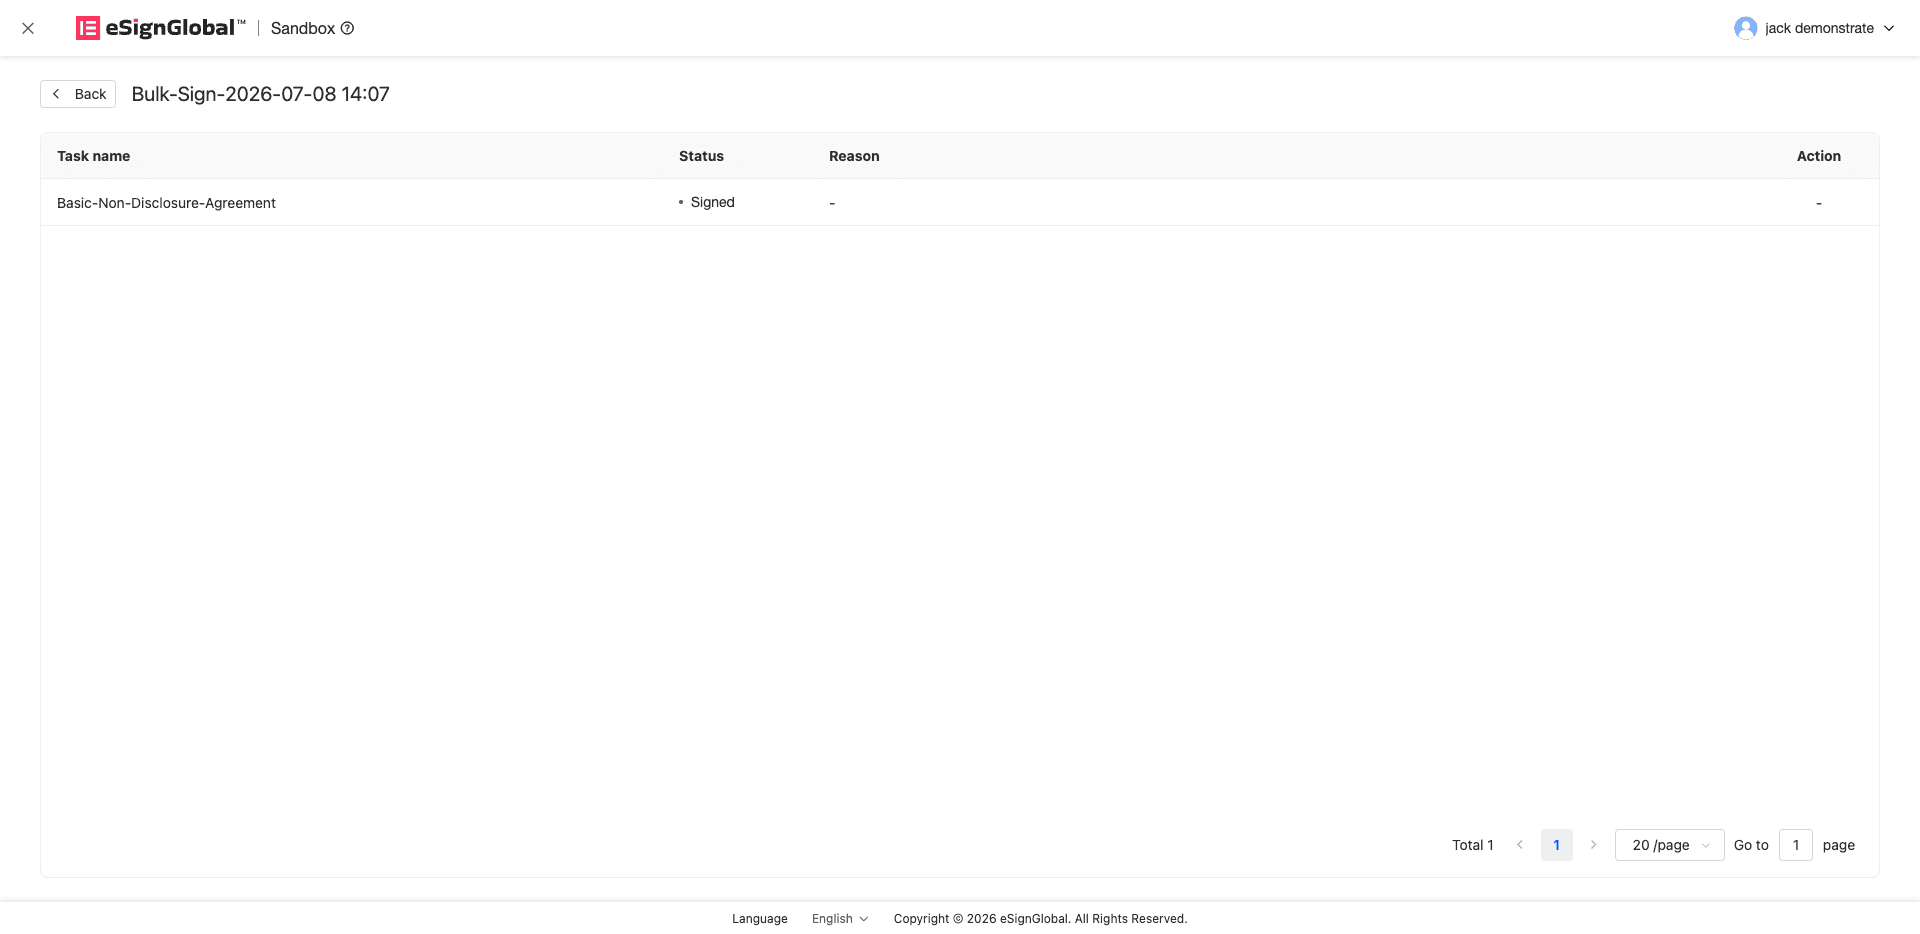
When the task allows viewing details, click [Details].
-
View the processing result for each envelope in the task details.
Sub-task results include:
- Completed: The envelope was signed successfully.
- Pending: The envelope is still being processed.
- Failed: The envelope signing failed.
-
For envelopes that failed to sign, click [Sign] to enter the standard single-envelope signing process to continue handling them.
Tip:
- Envelopes that were already successful in the batch signing will not be rolled back due to failures in other envelopes.
- If a task partially fails, you only need to handle the failed envelopes.
Blocking Rules
Batch signing is not supported in the following cases. Blocked envelopes will be displayed on the [Cannot Batch Sign] tab, or you will be prompted to switch to single-envelope signing upon submission.
-
The envelope has a view password or signing password set.
-
The envelope contains controls that require item-by-item filling or selection.
For example, text inputs, radio buttons, checkboxes, etc. Envelopes containing only required signature areas, seal areas, cross-page seal signing areas, and signing dates can still participate in batch signing.
-
The envelope includes FDA 21 CFR Part 11 compliance requirements.
-
The envelope contains digital signatures, corporate seals, or non-required signing areas.
The above scenarios require more detailed signing confirmation or compliance handling. Please use the standard single-envelope signing process.
-
The envelope contains non-required controls.
-
The envelope requires signers to upload attachments.
-
Batch signing is temporarily not supported on H5 mobile and Lark clients.
-
Batch signing is not allowed when using the eSign.AI border, or when the selected signature falls outside the signing area specified by the sender.
Note:
- If you encounter any of the above blocking situations, please return to the [Pending Signing] or [Inbox], and use the standard single-envelope signing process to handle the corresponding envelope.
- If you are unsure of the reason for the block, please check the reason description in the [Cannot Batch Sign] tab.


